How to Assemble a Power Wheels Lil Quad
I recently bought a Fisher Price Power Wheels Batman Lil Quad for my nephew Vince. The toy vehicle is a great buy and little Vince enjoys driving it for hours on end. I love its overall quality and the assembly process was a snap.
Regarding assembly, I discovered online that some parents are reluctant to purchase Power Wheels Lil Quads because they believe the quads are difficult to assemble. I wish to clear up this matter, hence why I created the page that you’re currently reading right now.
I would like to address the fact that Power Wheels Lil Quads are remarkably easy to put together. You want to know how to assemble a Power Wheels Lil Quad?
Just check out the assembly instructions below!
They’ll show you how easy it is to put this toy vehicle together. Pretty much anyone can do it.

Identifying the Components/Parts in the Box…
Open the box and make sure items listed below are available. If something is missing, please give the Power Wheels service center a ring at 1-800-348-0751. Don’t try to return the vehicle to the store where you bought it from. Better to call the service center as they’ll sort things out a lot faster.
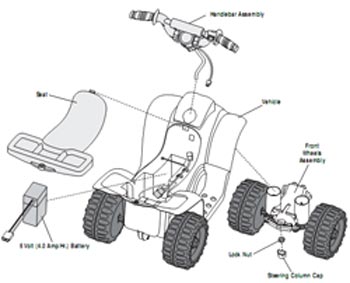
- 1 vehicle part with seat
- 1 front wheels part
- 1 handlebar part
- 1 steering column cap
- 1 6-volt rechargeable battery
- 1 6-volt charger
- 1 assembly tool
- 1 lock nut
- 16 decorative labels
Power Wheels Lil Quad Assembly Instructions…
Open the box and make sure items listed below are available. If something is missing, please give the Power Wheels service center a ring at 1-800-348-0751. Don’t try to return the vehicle to the store where you bought it from. Better to call the service center as they’ll sort things out a lot faster.
- 1 vehicle part with seat
- 1 front wheels part
- 1 handlebar part
- 1 steering column cap
- 1 6-volt rechargeable battery
- 1 6-volt charger
- 1 assembly tool
- 1 lock nut
- 16 decorative labels
Power Wheels Lil Quad Assembly Instructions…
Step One
First, you got to take out the battery which is stored under the seat. The battery must be charged before vehicle is used for the first time, and the initial charging period must be 18 hours minimum.
Please note that once assembly is completed, the battery no longer needs to be removed from the vehicle in order to be recharged. Now, to take out the battery, check the back end of the vehicle’s seat to find a lock fastener there.
Grab a slotted screwdriver and just turn that lock fastener until it reaches the unlock position. Lift up the seat to find the battery right underneath.
Step Two
You’ll find that the battery is well secured by a battery retainer. Remove the retainer by loosening its screw. Next, light the retainer and then gently take out the battery from its compartment.
Step Three
Hook up the battery connector with the charger connector, and then plug the charger into a wall outlet. Remember, this is the initial charging so length of charge must take a minimum of 18 hours, after which, subsequent recharging period can be reduced to 14 hours after each use.
Once the initial charge is completed, disconnect battery from the charger, and then unplug charger from wall outlet. Proceed to install the battery into the Power Wheels Lil’ Quad.
Step Four
Now, we focus on putting together the actual vehicle parts. Connect the handlebar part to the vehicle part with seat via a hole located on the front portion of the latter.
There’s a small square opening below that hole. The handlebar connector goes through that hole.
Step Five
Turn the vehicle over so that the whole unit rests on its handlebar. Now, grab the front wheels part and get it in position where its grille faces the front end of the vehicle.
You can clearly see a couple of tubes below the handlebar and the front wheels part has to be fitted directly into those tubes. The end of the steering column goes straight into the groove in the grille and then all the way through the hole situated in the vehicle’s front axle.
Step Six
Position the lock nut with the rounded side up, directly onto the end of the steering column. Get the included assembly tool and use it to tighten the lock nut. Next, grab the steering column cap and just snap it right over the tightened lock nut.
Step Seven
Now, it is time to turn the vehicle upright. You want to make sure the steering column is fully secured, so you can do that simply by pulling up the handlebar.
That’s how you determined if the steering column is fully secured. If you’re able to remove the column, it means that you didn’t correctly put together the retainer of the steering column.
Step Eight
This is the final step and all you need to here is link up the handlebar connector with the motor connector.
Alright, you’re done assembling a Power Wheels Lil’ Quad! At this point you can either let your child drive the vehicle, or spruce up the vehicle by applying the decorative labels which are included in the box.
I’d recommend doing the latter first. The decorative labels complete the whole look, so why waste them eh? I hope you find the assembly instructions helpful. You can see that the assembling process isn’t complicated at all. Only 8 steps are required, and they are so simple to do.
Good luck and have fun assembling the vehicle!

