How to Install a Power Wheels Battery
Okay this time around, I want to talk about how to install a power wheels battery. A friend of mine claims that power wheels battery installation is “complicated”, but I 100% disagree.
The task is pretty much a stroll in the park for me. You don’t need some fancy technical knowledge in order to install a power wheels rechargeable battery.
Let me tell you how it’s done…
Now, before you perform the installation, please take note of the following…
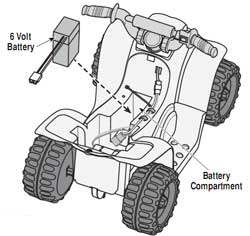
- To power up the vehicle, please use a 6-volt Power Wheels battery exclusively. Don’t try to put in any other battery, unless you want to ruin your child’s vehicle.
- Before you allow your child to drive the vehicle for the first time, make sure the battery has been charged beforehand for a minimum of eighteen hours.
- After your child has finished driving the vehicle, make sure to recharge the battery for a minimum of fourteen hours. In other words, the battery has to be recharged after each use.
- Avoid charging the Power Wheels battery for longer than thirty hours. That’s a sure-fire way of ruining the battery, and warranty will be voided as a result.
Now, before you perform the installation, please take note of the following…
- To power up the vehicle, please use a 6-volt Power Wheels battery exclusively. Don’t try to put in any other battery, unless you want to ruin your child’s vehicle.
- Before you allow your child to drive the vehicle for the first time, make sure the battery has been charged beforehand for a minimum of eighteen hours.
- After your child has finished driving the vehicle, make sure to recharge the battery for a minimum of fourteen hours. In other words, the battery has to be recharged after each use.
- Avoid charging the Power Wheels battery for longer than thirty hours. That’s a sure-fire way of ruining the battery, and warranty will be voided as a result.
Power Wheels Battery Installation Instructions
Step #1
- Check the back end of the Power Wheels seat. You’ll find a lock fastener there. Use a slotted screwdriver to unlock the lock fastener. Just turn it until it hits the unlocked position. Now you can lift up the seat.
Step #2
- See the battery retainer with the screw in it? Just loosen that screw and then take it out.
Step #3
- Place the Power Wheels battery inside the battery compartment. The wires should face the rear of the vehicle.
Step #4
- Now place the retainer over the battery and put the retainer’s screw back in. The screw goes through retainer’s hole and straight into the vehicle. You can go ahead and tighten the screw, just make sure you don’t screw it too tight though.
Step #5
Grab the battery and motor connector, and link them up. Next, grab the seat and cover the battery compartment. Make sure the front tab of the seat goes into the slot of the Power Wheels. The slot is situated just right below the handlebar assembly.
Step #6
Finally, with a slotted screwdriver in hand, turn the lock fastener in the back end of the seat until it hits the locked position.
Please note that the lock fastener must remain locked all the time. This is to prevent your child from getting a hold of the battery.
Alrighty then, the how to install a power wheels battery tutorial is now officially over!
I hope you find the above tutorial helpful and I wish you and your child a pleasant experience with the Power Wheels. This toy vehicle has been a massive source of fun and laughter for me and my kid!
