How to Build a Four Wheeler Flatbed Truck Toy
A low-profile truck with an airflow design meant for hauling heavy-duty goods.
TOOLS
Handsaw
Coping saw
Drill
⅛-inch drill bit
⅜-inch drill bit
Ruler or T square
Rasp
C-clamps
Center punch
Pencil and paper
Coping saw
Drill
⅛-inch drill bit
⅜-inch drill bit
Ruler or T square
Rasp
C-clamps
Center punch
Pencil and paper
MATERIALS
Wood (Use an oak wood block for the main piece and a dark hardwood for the sides. Cut wheels, axles, and cotter pins from dowel rods.)
Main piece: (1) 4 by 4 by 10 inches
Railing sides: (2) 2 by ½ by 7 inches
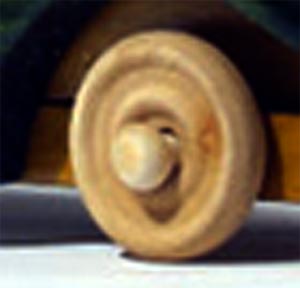
Wheels: (6) 2 inches in diameter, thickness is optional
Axles: (3) ⅜ inch in diameter by 7 inches
Cotter pins: (6) ⅛ inch in diameter by 1 inch
Glue
Sandpaper, coarse, medium, and fine grades 2
Small brass brads (optional)
Finishing materials (See instructions)
Main piece: (1) 4 by 4 by 10 inches
Railing sides: (2) 2 by ½ by 7 inches
Wheels: (6) 2 inches in diameter, thickness is optional
Axles: (3) ⅜ inch in diameter by 7 inches
Cotter pins: (6) ⅛ inch in diameter by 1 inch
Glue
Sandpaper, coarse, medium, and fine grades 2
Small brass brads (optional)
Finishing materials (See instructions)
THE TOY
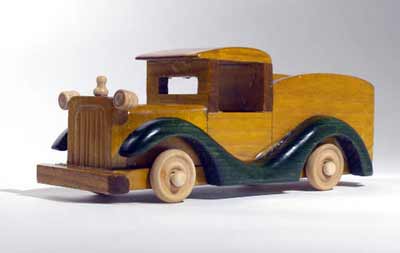
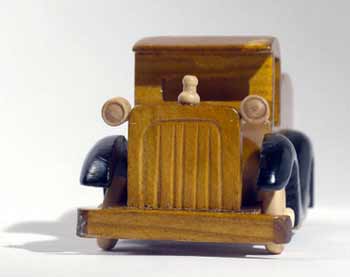
Trucks have long been immensely appealing to children and adults alike. Their functional, streamlined design belies their brute strength, which makes them all the more awesome-looking as they perform their Herculean tasks.
The design for this particular truck is derived from the aerodynamic design of cars and airplanes from the 1930s and early 40s.
The windswept fenders and cab, devoid of tacky and protruding hardware, gave them the look and style of the future's technology. This version becomes symbolic of all trucks because it has a decidedly "no-nonsense" contour.
This is a hefty toy, and underneath its simple exterior should lie good craftsmanship. Dimensions of the wood may be modified to either enlarge or reduce the overall size.
Grain marks in the woods, as well as contrasting colors, will make this a very special project, which can be built with an economy of time and material.
PROCEDURE
Use woods that you have carefully examined for color and grain striations. Think in terms of placement of the parts and the smooth, well-rounded wheels.
All surface contours should be of continuous flow; i.e., flat and at right angles where needed. The cab should also reveal a natural curve free of bumps and dents.
Cut the wood block as specified and draw measurements on both its broad surfaces. Draw an outline on the narrow edge with a ruler or T square.
Saw all the individual wood parts away from each other and shape them according to your specified dimensions. Begin with lengthwise saw cuts wherever possible, then saw crosswise and diagonally.
Round off the cab with the coping saw, then further smooth the surface with coarse sandpaper or a rasp. File and sand with the grain to prevent the wood from breaking up.
Drill three holes through the block with the 3/8-inch drill bit and insert the matching dowels so that they protrude from both sides an equal amount. (The axles are not meant to spin. The rolling motion will be accomplished by the wheels turning freely on the axle. If the wood wheels tend to bind on the chassis, insert a piece of thin leather to act as a bushing.)
Drill through the center of each wheel and place them in position on the axles. Drill the ends of the axle in the center with the 1/8-inch bit.
It is a good idea to place the dowel wheels in a vise or to clamp them to a scrap piece of wood while drilling. If the wheels are not anchored, they tend to spin when the drill bit engages the wood.
Also, by tapping a slight indentation with a center punch, the drill bit is less likely to be deflected from its path. Insert small dowel strips to act as "cotter pins,” which will prevent the wheels from coming off.
Glue the two railing sides to the bottom and edge surfaces with a small amount of glue. Clamp and let stand until thoroughly dry.
An optional addition to the front of the truck would be two small brass brads. These would represent headlights and would nicely complement the oak.
FINISHING
Because of its hardness, oak must be worked slowly with sandpaper and steel wool. Sand with the grain in short strokes, applying more or less pressure where needed to remove crosscut marks.
If the wheels do not spin freely, and, once you have determined that the hole in the wheel is not too small, add a small amount of paste wax to both the inside of the wheel and the axle tips.
The cotter-pin dowels are to be permanent and are made so with a couple of drops of wood glue. Apply the finish only after the wood has been rubbed with a piece of cheesecloth to remove all dirt and dust particles.
Either paste wax or an oil finish prepared from one of the recipes presented in the video below will do nicely. A clear sealer, as an alternative, will give the wood a more permanent finish by closing up the pores.
