Instructional Guide for Assembling the John Deere Ground Force Tractor Toy
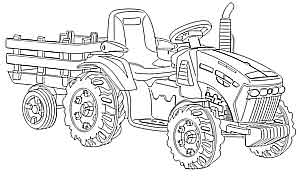
One of the best ride-on toy tractors on the market is without a doubt, the John Deere Ground Force you see below.

This tractor toy is straight up superb! It is perfect for little boys. Several of my outdoor friends bought the Ground Force for their boys and every single one of them love this toy. In fact, their boys often ride it for hours on end. Now don’t get me started with my youngest son whom I purchased the toy for his birthday last year. His name is Zachary, and he’s totally into the Ground Force ride-on tractor. He rides it for at least an hour per day.
I’m so delighted that I’ve found a toy that Zachary truly loves. Previously, I bought him some action figures and remote control toys, but I noticed that he didn’t really enjoy playing with them. Turns out, Zachary has a deep penchant for ride-on toys. They’re quite pricey, but I don’t mind at all – as long as they make Zachary happy.
Anyway, the reason I’m putting out this post is not to sing praises on the John Deere Ground Force tractor toy. God knows how many positive reviews that toy has amassed over the years! If reviews are what you’re looking for, you can easily find them on sites such as Toys“R”Us or Amazon. I even wrote my detailed opinion of it quite a while ago. As the title of this post suggests, the aim here is to provide a solid, easy-to-understand guide on how to put together the Ground Force tractor.
You see, there aren’t many complaints about the toy as many parents are happy with it. Complaints are present on several major online marketplaces that sell the Ground Force tractor toy, including the two I mentioned just now, though those complaints mostly center on how difficult it is to assemble the toy. To be frank, I too found it to be difficult to assemble, initially. But after analyzing the parts for some time, I soon learned that putting the toy together isn’t hard at all. Please refer the instructional guide below. I guarantee if you follow it one step at a time, you too will find that assembling the John Deere Ground Force ride-on tractor is one of the easiest tasks in the world.
Step 1
See the bottom part of the trailer which is attached to the bottom of the tractor toy? Look for the screws that keep that part attached. Do you see them? Okay now, proceed to remove all the screws with a screwdriver.
Step 2
In the box, you’ll find a total of four self-locking washers. Just pick one first, and stick it right into the special tool. That tool comes with the tractor. Do take note that each self-locking washer has tabs on it, and those tabs must be rotated so that they face the special tool’s interior section.
Step 3
Grab the tractor’s axle part and get rid of its protective caps. Go grab a hammer and proceed to pound the special tool so that it goes in deep enough in order for you to be able to put in the axle part. Now you can cast the special tool aside.
Step 4
The necessary components have to be slipped onto the axle part. Those components must go in the proper order and that is washer first, followed by wheel, then the second wheel, then finally, another washer.
Step 5
Take hold of the special tool and put a self-locking washer in it. Embed the axle you just prepared in step 4 into the tool and don’t forget to give in a good pounding with a hammer. Make sure it goes in as deep as possible.
Step 6
Grab the wheel unit and lock it right into the trailer’s base. Press firmly to keep the wheel unit in a secure position.
Step 7
Get the provided red pin and stick it directly into the end portion of the tractor’s trailer.
Step 8
Check bottom of the bed for protective caps. There should be five of them. Take them off one at a time.
Step 9
Get the bottom portion of the trailer which you’ve prepared earlier, and stick it to the bed. If they don’t seem to stick with one another, just press firmly and I guarantee they will stick well.
Step 10
The trailer comes with 3 sides and you must connect them into the 3 empty slots situated right within trailer’s base.
Step 11
Put together the chassis and the green counterweight. Please ensure the pegs of the chassis go directly into the counterweight’s holes. Secure these 2 parts with a couple of screws.
Step 12
Now it’s time to fix the hood into the chassis. Make sure you turn the hood to keep it close. Also, don’t forget to turn the black colored latch which is designed to secure the tractor’s hood to its chassis.
Step 13
Install the toy tractor’s central headlights. Once done, go ahead and install the other 2 headlights.
Step 14
Check the bottom part of the tractor’s seat for knobs. Those knobs need to be removed before you put in the seat. Once you’ve unscrewed those knobs and set them aside, proceed to install the tractor’s seat. Before securing the seat in place, you should make sure the seats are adjusted according to your kid’s height. To secure the seats, use the knobs that you unscrewed earlier.
Step 15
Install the front seat support into the chassis. Use a couple of screws to secure it in place.
Step 16
Cover both rear fenders of the toy tractor with the provided black plastic covers. Each fender has a slot for you to embed the cover.
Step 17
Check the back section of the toy tractor. There’s no gas cap right? Go get the gas cap and put it in place.
Step 18
Grab a couple of AA batteries and place them in the tractor’s FM radio. The batteries can be inserted via door located right on the back side.
Step 19
Connect the FM radio to the tractor. Under the steering column, there’s a space within the chassis. The radio goes into that space. Only a single screw is required to fasten the radio in place.
Step 20
Install the steering column by inserting one end from the bottom section of the tractor’s body, and the other end goes all the way through the upper section.
Step 21
Fit the steering wheel into the steering column. Tighten it with the steering wheel’s screw and nut.
Step 22
Install the exhaust and fasten it with the long screw.
Step 23
Now you can attach the full-size detachable trailer to the Ground Force tractor.
Step 24
Open the tractor’s hood and get on with connecting the plug belonging to the rechargeable battery directly to the electrical system.
Step 25
Close the hood. Now, your kid can begin operating the John Deere Ground Force toy tractor!
