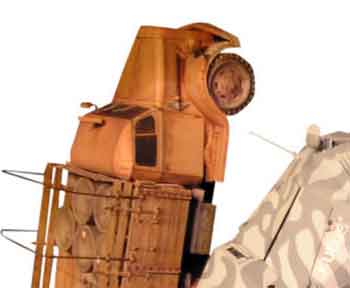
Instructions for Building a 4 Wheeler Toy Tank Truck
Model T’s were used in a variety of ways. Henry Ford had created the universal chassis on which America could power herself. Taking a lesson from Ford himself, the designer created yet another variation of the Model T.
The instructions for building this tank truck are very similar to the truck in the previous project. Besides the tank on the back, the only other changes are in the body and the length of the base.
The instructions for building this tank truck are very similar to the truck in the previous project. Besides the tank on the back, the only other changes are in the body and the length of the base.
While you’re building this 4 wheeler toy tank truck, think of other designs that could utilize this chassis. By using this basic assembly, you can create your own designs like a stake truck, a moving van, or even a wrecker. The ideas are as endless as your imagination.
But do remember that the easiest way to make variations on this truck is to have spare parts on hand—especially wheels, engines, and fenders. While making this model, make lots of extra parts— you won't regret it.
But do remember that the easiest way to make variations on this truck is to have spare parts on hand—especially wheels, engines, and fenders. While making this model, make lots of extra parts— you won't regret it.
INSTRUCTIONS
1. BASE ASSEMBLY
Cut the stock for the base to length and width. It you’re making several of these trucks, rip long boards to 3" wide, then cut them to 8" lengths.
Next, cut the stock to length and width to form the 3/4" x 1” x 3-3/4" axle holders. Clamp the axle holder stock securely to a drill press table and drill the 5/16"-diameter axle holes where indicated in the picture below. After the holes have been drilled, lay out and cut the notches on the ends of the holders.
CAUTION: Because of the small size of stock, use only a coping saw, scroll saw, or handsaw for cutting the notches. DO NOT attempt this cut on a table saw or radial arm saw.
Finally, drill the exhaust pipe hole and glue the exhaust pipe into place. Glue and clamp the axle holders to the base; then set the base assembly aside.
2. BODY
The truck body is similar to the model T pickup truck four wheeler toy. Make the body for this model using a compound cutting method. Glue up four pieces of 1 x 4 stock to form a 3"'thick block. Cut the stock to length to yield a 3" x 2-3/4" x 4-1/2" block. Transfer the top and side patterns from the following image to the block.

Turn the block on its side and drill three 3/8" holes in the corners of the cutout. Now, using a bandsaw or scroll saw, cut out all the side contours. To get the 2-1/4" width on the front, tilt the bandsaw or scroll saw table 10° and, keeping the front of the body on the table, bevel the sides.
Unlike the bodies on the other Model T's, this body cannot be set on the rear slope of the roof to drill the 1 /4"-diameter steering wheel hole. Instead, clamp the stock securely and estimate the location and angle of the hole; it s not critical.
Finally, using a 1 -1 /4"-diameter hole saw, cut out the steering wheel. Insert the steering column into the steering wheel hole and glue the steering wheel to the column. Set the body aside.
3. ENGINE
Glue and clamp three pieces of 3/4" x 1-3/4" x 10" pieces of stock to form the block for the engine. The extra stock is for safe handling while machining, but it can also be used for other Model T’s.
After getting the stock to the proper thickness and width, chamfer the top edges with a bandsaw, scroll saw, or power sander. Cut the engine(s) to length; then measure 3/8" from the end and form a 1/16"-deep radiator line with a bandsaw blade.
Finally, drill the W-diameter x 3/8"-deep radiator hole and glue the radiator cap into place. Glue and clamp the engine to the base and sand the front flush. Glue and clamp the body in place.
4. TANK
For the tank, you’ll need to glue up four pieces of 3/4" x 3" x 10" pieces of stock (this is enough for two tanks). Clamp the stock securely and allow the block to set overnight to guarantee that the glue is dry. When the stock is ready, turn it on a lathe to round. If you don’t have a lathe, substitute an old rolling pin; the diameter doesn't have to be exact.
Next, flatten one side of the tank about 1/4". Set the tank on a drill press table and drill the 1-1/2" hole in the top for the Lank dome. Use a spade bit or Forstner bit to form this hole. Glue and clamp the tank to the base.
Make the tank dome out of 3/4" stock using a 1 -5/8"-'diameter hole saw. Next, use a 3/8" twist drill bit to drill out the 1/4"-diameter hole left by the hole saw pilot in the tank dome. Glue the dome into the top of the tank and glue the dome cap into the 3/8" hole.
5. FENDERS
Lay out the fenders on a piece of stock; then use a bandsaw or scroll saw to cut them out. Next, drill the 1/4"-diameter holes in the front of the fenders for the headlamp columns.
The headlamps need to be drilled for the headlamp columns. Drill the column holes in the headlamp stock before you cut the headlamps to final dimension; this assures safe handling of the stock while drilling. After drilling the holes, cut the headlamps to length. Glue the headlamp columns to the headlamps; then glue these assemblies to the fenders.
Attach the fenders to the main assembly with glue and clamp them securely. After the glue dries, drill two 1/4" -diameter reinforcement holes through the fenders and into each side of the truck. Glue the reinforcement dowels into place and sand flush.
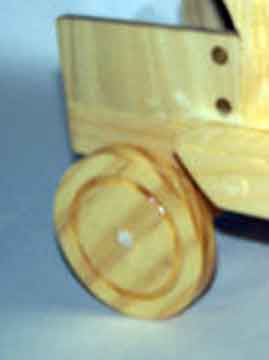
6. WHEELS
Prepare 3/8"- thick stock for the wheels; then use a 1-7/8' -diameter hole saw to create the “rims’’ Next, cut out the wheels using a 2-1/2"-diameter hole saw. Make extra wheels for other Model T’s while you’re at it.
Unlike the bodies on the other Model T's, this body cannot be set on the rear slope of the roof to drill the 1 /4"-diameter steering wheel hole. Instead, clamp the stock securely and estimate the location and angle of the hole; it s not critical.
Finally, using a 1 -1 /4"-diameter hole saw, cut out the steering wheel. Insert the steering column into the steering wheel hole and glue the steering wheel to the column. Set the body aside.
3. ENGINE
Glue and clamp three pieces of 3/4" x 1-3/4" x 10" pieces of stock to form the block for the engine. The extra stock is for safe handling while machining, but it can also be used for other Model T’s.
After getting the stock to the proper thickness and width, chamfer the top edges with a bandsaw, scroll saw, or power sander. Cut the engine(s) to length; then measure 3/8" from the end and form a 1/16"-deep radiator line with a bandsaw blade.
Finally, drill the W-diameter x 3/8"-deep radiator hole and glue the radiator cap into place. Glue and clamp the engine to the base and sand the front flush. Glue and clamp the body in place.
4. TANK
For the tank, you’ll need to glue up four pieces of 3/4" x 3" x 10" pieces of stock (this is enough for two tanks). Clamp the stock securely and allow the block to set overnight to guarantee that the glue is dry. When the stock is ready, turn it on a lathe to round. If you don’t have a lathe, substitute an old rolling pin; the diameter doesn't have to be exact.
Next, flatten one side of the tank about 1/4". Set the tank on a drill press table and drill the 1-1/2" hole in the top for the Lank dome. Use a spade bit or Forstner bit to form this hole. Glue and clamp the tank to the base.
Make the tank dome out of 3/4" stock using a 1 -5/8"-'diameter hole saw. Next, use a 3/8" twist drill bit to drill out the 1/4"-diameter hole left by the hole saw pilot in the tank dome. Glue the dome into the top of the tank and glue the dome cap into the 3/8" hole.
5. FENDERS
Lay out the fenders on a piece of stock; then use a bandsaw or scroll saw to cut them out. Next, drill the 1/4"-diameter holes in the front of the fenders for the headlamp columns.
The headlamps need to be drilled for the headlamp columns. Drill the column holes in the headlamp stock before you cut the headlamps to final dimension; this assures safe handling of the stock while drilling. After drilling the holes, cut the headlamps to length. Glue the headlamp columns to the headlamps; then glue these assemblies to the fenders.
Attach the fenders to the main assembly with glue and clamp them securely. After the glue dries, drill two 1/4" -diameter reinforcement holes through the fenders and into each side of the truck. Glue the reinforcement dowels into place and sand flush.
6. WHEELS
Prepare 3/8"- thick stock for the wheels; then use a 1-7/8' -diameter hole saw to create the “rims’’ Next, cut out the wheels using a 2-1/2"-diameter hole saw. Make extra wheels for other Model T’s while you’re at it.
Cut the axles to length, then glue the wheels and axles to the truck. Your Model T tank 4 wheeler toy truck is now complete and ready to go to work! Paint, the truck anyway you wish and consider using an old gas company logo on the side of the tank like “Pure,” "Shell,” or even the Texaco star.
